
Maps
Ascent
In one line: A two-site map with a big, open mid: whoever controls it can threaten both sites and split the defense. Two mechanical doors, one per site, can be closed to cut off the path from mid.
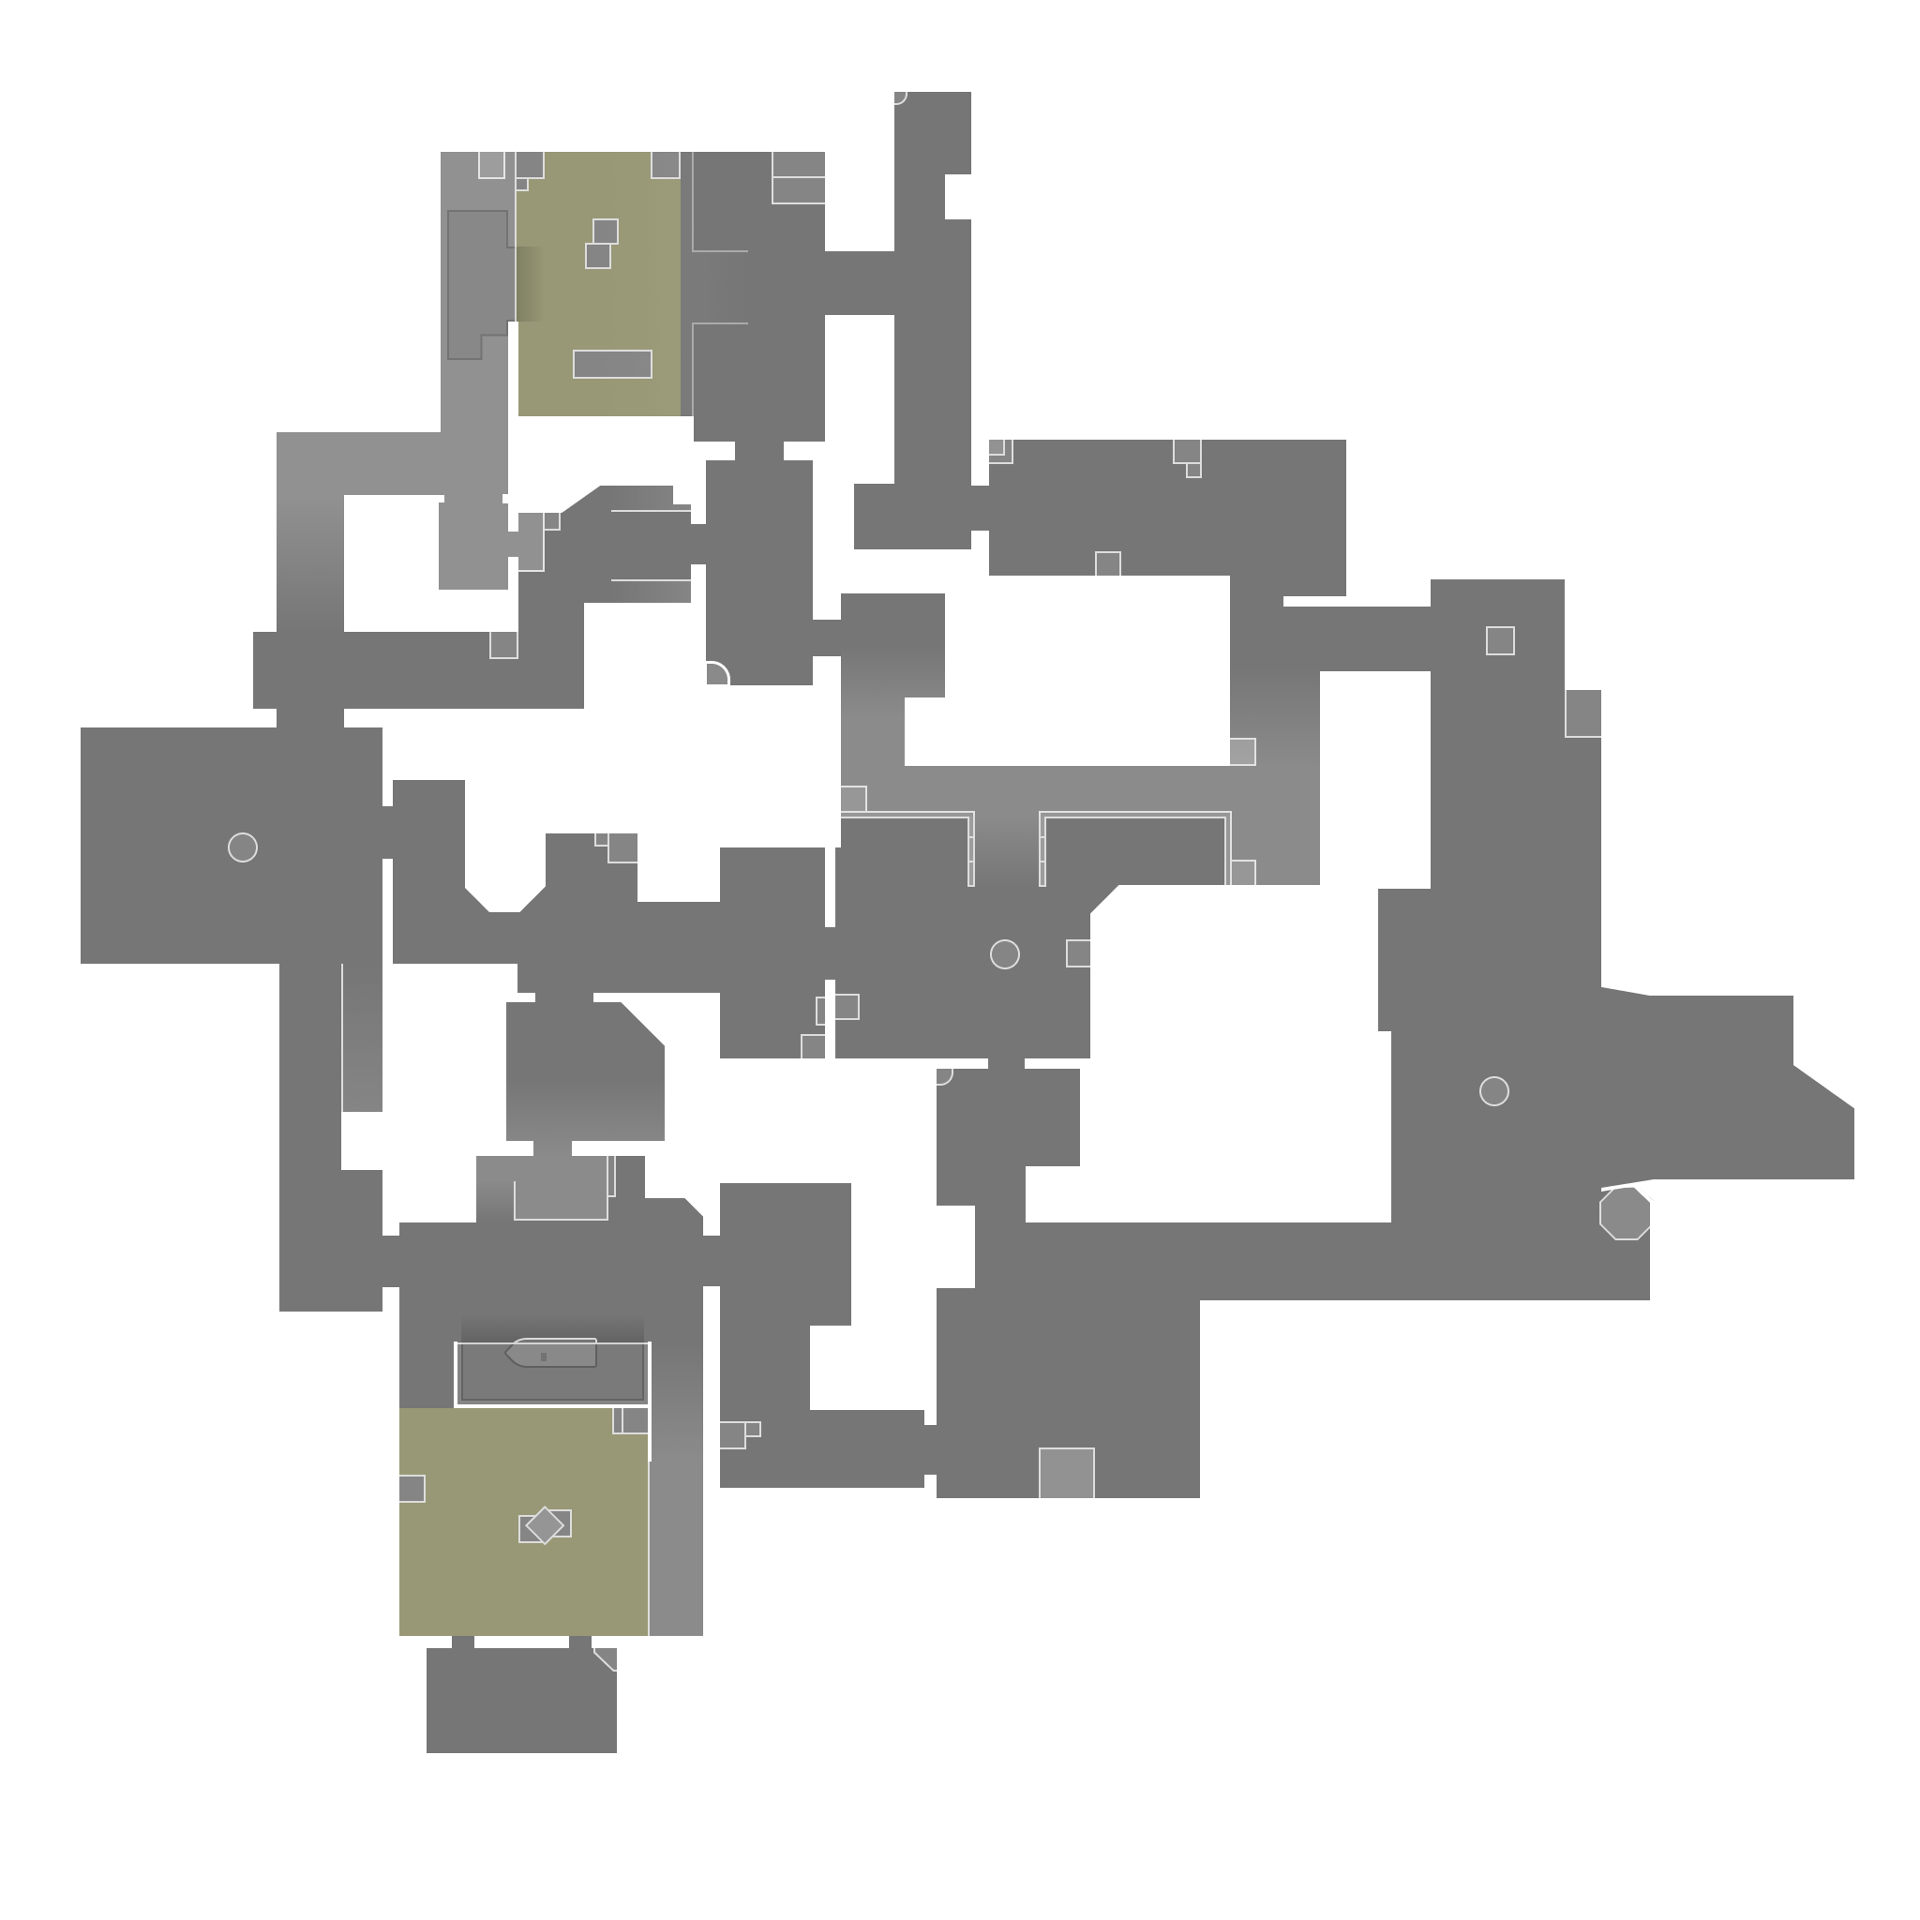
Everything on the map, as a list
Same content as the drawing. Select an item to highlight it on the map.
Callouts
Win condition
Ascent is almost always decided in mid. Mid Courtyard is a big, open space connected to both sites: whoever controls it can threaten A through Catwalk and B through Market, forcing the other team to cover everything.
On attack the win condition is taking enough mid control to choose the site at the last moment, or hitting a site with a full execute when the defense has sent players to mid. On defense it is denying mid early (with utility and players), so the attack is forced through the mains, where the defense is waiting.
The two mechanical doors (one between A site and mid, one between B site and Market) are an important detail: closed, they cut the path from mid to site; they can, however, be broken with enough shots.
The ten questions
The ten questions from the chapter on how to study a map, applied to Ascent:
- Does mid matter? Enormously: it is the key to the map.
- Is a lot of information needed? Yes: the sites are wide, with many positions.
- Are the chokes narrow? The mains are fairly narrow corridors; so are Catwalk and the passage towards Mid Top.
- Are precise smokes needed? Yes, especially on the sites' defensive positions and on Mid Top.
- Does blocking rotations matter? Yes: the doors and mid control change rotation timings.
- Are there many angles to clear? On the sites, yes, especially A.
- Is the retake strong? Fairly, because the defense comes from a nearby spawn; a closed door can complicate it.
- Is one area held for a long time? Mid, often by one player with utility.
- Are there strong splits? Yes: mid and a main together towards the same site.
- How much does lurking matter? Quite a lot, especially in mid to cut rotations.
Callouts
Ascent's main callouts (twenty-two in all), to use in game:
- A: A Lobby, A Main, A Site, A Wine, A Rafters (also called Heaven), A Garden, A Tree, A Window;
- Mid: Mid Bottom, Mid Catwalk, Mid Cubby, Mid Courtyard, Mid Top, Mid Pizza, Mid Market, Mid Link;
- B: B Lobby, B Main, B Site, B Boathouse;
- Spawns: Attacker Side Spawn and Defender Side Spawn.
The interactive map above marks the sites, spawns, mains, lobbies and main mid areas. The smaller callouts (Wine, Rafters, Garden, Tree, Window, Cubby, Pizza, Link, Boathouse) are in the list: learn to connect them to the right area by looking at the in-game minimap.
Chokepoints
The narrow passages almost every play goes through:
- A Main, the corridor from A Lobby to A site;
- B Main, the corridor from B Lobby to B site;
- Catwalk, the raised passage linking mid to the A area;
- the passage between Mid Courtyard and Mid Top, towards the defense's side;
- Market, with the door to B site.
These are the spots where delay utility (mollies, slows, barriers) pays off most on defense, and where the attack has to go in with smokes and flashes.
The sites
A site: you enter through A Main (attack side) and, from mid, through the passage with the door. The defense has raised positions (A Rafters, called Heaven), angles close to the entrance and the A Tree and A Garden area towards its spawn. It is a site with many angles to clear: an entry from A Main with no utility almost always meets a defender in position.
B site: you enter through B Main and, from mid, through Market (with the door). The site is more compact, with the Boathouse among the positions to check. A sentinel holding B alone is a common choice, because the entrances are few and predictable.
On both sites, closing the door takes away the attack's entry from mid: useful for the defense, but careful, it also closes your own rotation.
Mid
Ascent's mid is a big courtyard (Mid Courtyard) connected to:
- Mid Bottom, towards the attacker spawn;
- Mid Catwalk and Mid Cubby, towards the A area;
- Mid Top, towards the defender spawn;
- Mid Market, Mid Pizza and Mid Link, towards B site and the defender spawn.
It is an open space with long lines: anyone crossing it without utility is exposed from several spots. That is why mid control is almost always taken with smokes (on the lines from Mid Top and Market) and information (a bolt, a drone).
Control areas
The areas that matter most for map control:
- Mid Courtyard: the center of everything. Whoever holds it threatens both sites;
- Market: links mid to B site. For the attack it is B's secondary entrance; for the defense it is the quick rotation route;
- Catwalk: links mid to the A area. Taking it lets the attack threaten A from two sides;
- Mid Top: the defense's gateway to mid.
On the interactive map, the "control areas" layer highlights the Courtyard.
Rotations
The defense usually rotates through its spawn, which is close to both sites: defensive rotations are relatively short. If the defense controls mid, it can also rotate through Market and the passage towards A, even faster.
The attack, if it does not control mid, rotates through its own spawn (from one lobby to the other): a long rotation. If it controls mid, it can switch sites much faster, which is one of the reasons mid matters so much.
The doors change the timings: a closed door forces rotating players to go around or break it.
Default on defense
A common defensive setup:
- A held by two players, often one near the A Main entrance and one deeper or raised;
- B held by a sentinel, covering B Main and Market with utility;
- mid contested by one or two players, from Mid Top or Market, with utility to deny the Courtyard early.
There are many variations: some teams put more players in mid in the first seconds to gain an advantage, others play the sites more passively and give mid to the attack, preparing for rotations.
Default on attack
A common attacking default:
- one or two players take mid (Mid Bottom, Catwalk), with a smoke on the line from Mid Top;
- one player in A Lobby and one in B Lobby, to gather information on the mains;
- an initiator uses info utility on mid or a site.
The goal is to find out whether the defense is contesting mid and how many players are on each site, to decide where to go.
Where to contest
The spots where the two teams clash most often:
- Mid Courtyard and Catwalk, in the first seconds of the round;
- Market, which the defense uses to contest mid from the B side;
- Mid Top, where the defense holds the line on the courtyard;
- the main entrances, when the attack tries to take space towards the sites.
On defense, contesting mid early with utility (a bolt, a smoke, a molly) is often the difference between an attack that chooses freely and one forced through the mains.
Where to take space
Where the attack takes space:
- Mid Bottom and Catwalk: often free in the first seconds, they are the first step to mid control;
- A Lobby and B Lobby: "free" space near spawn, from which to threaten the mains;
- Market, after taking the Courtyard: from there you threaten B through a second entrance.
On defense, space is taken in mid: whoever holds Market or Mid Top early takes away most of the attack's options.
Common setups
Some typical defensive setups, with no lineups:
- a sentinel on B with traps on B Main and Market, holding the site alone and calling the entries;
- a controller with smokes for mid ready for Mid Top and Market, to deny the Courtyard;
- an initiator using info utility on A Main or mid at the start of the round;
- on A, one raised player and one near the A Main entrance, covering each other.
Changing setups during the match matters: on Ascent, predictable defenses get read quickly.
Typical executes
Typical executes:
- A from A Main: smokes on the site's defensive positions (the raised ones and those towards A Tree and A Garden), a flash on the corner near the entrance, going in together;
- A from two sides: with Catwalk control, part of the team enters from A Main and part from the mid side;
- B from B Main: smokes on Market and the back positions, a flash on site, a fast entry. A sentinel on B has to be found or switched off with utility before going in;
- B from two sides: B Main and Market together, if the attack controls mid.
In every execute, keep something for the post-plant: the defense rotates quickly from its spawn.
When to fake
On Ascent fakes work well because the defense rotates quickly from spawn. A typical fake:
- some utility and noise on a main (for example smokes and footsteps in B Main);
- a player in mid confirming the defense's rotation;
- the real execute on the other site, ideally with mid control to arrive sooner.
The fake pays off most against defenses that have already rotated early in previous rounds.
When to split
A split comes naturally on Ascent, because mid leads to both sites:
- A: part from A Main, part from the mid side (Catwalk and the passage with the door);
- B: part from B Main, part from Market.
The requirement is mid control: without it, the group going through mid gets caught from Mid Top or Market. You also need a shared signal to go in at the same moment.
When to abandon a plan
When to abandon a plan:
- if mid is contested with lots of utility and you have already lost a player, insisting on mid costs too much: better an execute from a main with the utility you have left;
- if a main is shut by heavy defensive utility (mollies, barriers, traps) and more than 40 seconds remain, the other site is probably weaker;
- if the site door is closed and the plan was to enter from mid, breaking the door costs time and noise: consider the other entrance.
Retakes
The retake on Ascent fairly favors the defense, because the spawn is close to both sites. The keys:
- come in from several sides: for A, from the spawn side and from mid; for B, from Market and from the spawn side;
- use information: a bolt or an eye on the site tells you where the attackers have set up;
- watch the doors: if the attack has closed them, one of the retake entrances is blocked.
The chapter on retakes explains the order and timings.
Lurking
The lurk on Ascent is played mostly in mid: an attacker staying in Catwalk or Mid Bottom while the team executes can hit defenders rotating through the Courtyard, or enter the site from the mid side.
On defense, a player staying in Market or Mid Top while the attack executes can catch it from behind in the post-plant. In both cases the lurk is only worth it if its timing is coordinated with the rest of the team.
Who usually plays where
Who usually plays where (on defense):
- sentinels often hold B, because the entrances are few and predictable;
- controllers play near mid or between mid and a site, to have smokes ready for both;
- initiators often play A or mid, where info utility is most useful;
- duelists play A (often raised or aggressive positions) or contest mid early.
On attack, duelists enter through the mains, while controllers and initiators prepare mid and the executes.
If you see an enemy in mid
If on attack you see an enemy in mid early:
- the defense is contesting mid: expect a fight or utility on Catwalk and Mid Bottom;
- one site probably has one player fewer: if two are in mid, one of the sites is held by a single player;
- do not chase them into the Courtyard without utility: it is open, exposed from Mid Top and Market.
If instead the team has already decided the site, an enemy in mid becomes a flank risk: leave a player to cover Catwalk or Market during the execute and the post-plant.
On defense, an attacker seen in mid early means the attack wants the center: call it and get utility ready to deny it.
Recommended agents and why
Agents who shine on Ascent, with the reason (the matrix gathers all the reasons):
- Sova: big sites and an open mid, where a bolt reveals many positions;
- KAY/O: the defense uses lots of sentinel utility on the sites, and the knife switches it off;
- Omen: long-range, recharging smokes for mid and the sites at different phases;
- Killjoy: holds a wide site alone, with a very strong post-plant;
- Jett: long lines and spots to shoot from and disappear;
- Cypher: wires on the mains and Market for constant information.
A common composition has a controller, one or two initiators, a sentinel and a duelist.
Typical mistakes on this map
Typical mistakes on Ascent:
- crossing the Courtyard without utility: it is open and visible from several spots;
- giving mid to the attack without even a piece of information: the attack picks its site in peace;
- closing a door and then needing to rotate through it;
- forgetting A's raised positions during the entry;
- going into B without looking for the sentinel: traps and gadgets on B punish players who rush in;
- spending all your utility to take mid and reaching the execute with nothing.
If you play duelist
On Ascent the duelist has two main jobs: entering through A Main or B Main after teammates' utility, and taking fights in mid in the first seconds to give the team control of the center. On defense, A's raised and aggressive positions and early fights in mid are their ground. Watch the Courtyard: it is easy to take a fight from one angle and find yourself exposed to a second from another.
If you play initiator
The initiator is valuable on Ascent: the sites are wide and mid is open, so early information (on a site or on mid) changes the round. On attack, they set up the entries through the mains with information and flashes; on defense, they gather info on mid at the start and keep utility for the retake, which is often playable on Ascent.
If you play controller
The controller on Ascent has to manage two things: mid and the sites. The smokes to take or deny mid (on the lines from Mid Top and Market) are not the same as those for the executes, and using them all in the first seconds leaves the team exposed later. A controller with long-range or recharging smokes finds ideal ground here.
If you play sentinel
The sentinel on Ascent often holds B alone, with traps on B Main and Market and gadgets on site: few, predictable entrances are ideal ground. Alternatively, a sentinel with information can watch the mid flank. On attack, they protect the post-plant and the flank from rotations through mid.
With Sova on this map
With Sova on Ascent, learn at least one info bolt for each site and one for mid, thrown from safe spots at the start of the round. On attack, the bolt on a site before the decision tells you where to go; on defense, the bolt on mid tells you whether the attack wants the center. Keep a bolt for the retake.
With Omen on this map
With Omen on Ascent, long-range smokes let you deny mid from Mid Top or Market without exposing yourself, and the recharge gives you smokes for the execute or the retake. Paranoia through walls is useful on the main entrances.
With Killjoy on this map
With Killjoy on Ascent, the typical role is holding a site (often B) alone: turret on one entrance, bot on the other, grenades ready for the execute or the plant. Remember the gadgets' range: if you move away to help mid, they switch off.
With KAY/O on this map
With KAY/O on Ascent, the knife on the site before the execute switches off the sentinel utility the defense often uses to hold it, and tells you how many defenders there are. The flash is useful on the main entrances.
With Jett on this map
With Jett on Ascent, the long lines of the sites and mid reward the Operator and the escape dash. On attack you go in through a main after the utility; on defense you can take an early aggressive fight and disappear before the trade.
With Cypher on this map
With Cypher on Ascent, wires on B Main and Market (or on A Main) give constant information, and the camera can watch mid or one site while you play the other. Change setups during the match: on Ascent they get read quickly.